 Serv-Minecraft
Players and backups
Managed from the Serv-Minecraft client area. 4 answers, updated October 5, 2026.
Key questions 2
Giving myself admin rights (OP)
Type op YourUsername in the console while the server is running.
Start the server and open the Console tab.
Type
op YourUsername(no slash in front, it's a console command).In-game, commands like
/gamemode creativeare then available.
Common errors
- Giving OP to everyone opens the door to griefing the server: for finer-grained ranks, install the LuckPerms plugin on a Paper server instead of handing out OP widely.
deop Username removes the rights.
Backing up and restoring my server
Backups are a paid option: turn it on from the Abonnement (subscription) card in the Console tab, then create a backup in the Backups tab before any major change.
In the client area
Console tabAbonnement card (activation), then Backups tab (the panel is in French)OpenIf the option isn't on (the Backups tab shows "Option Sauvegardes non activée"): Console tab, Abonnement card, click Activer pour (turn on for; the monthly price is shown on the button) and complete the payment.
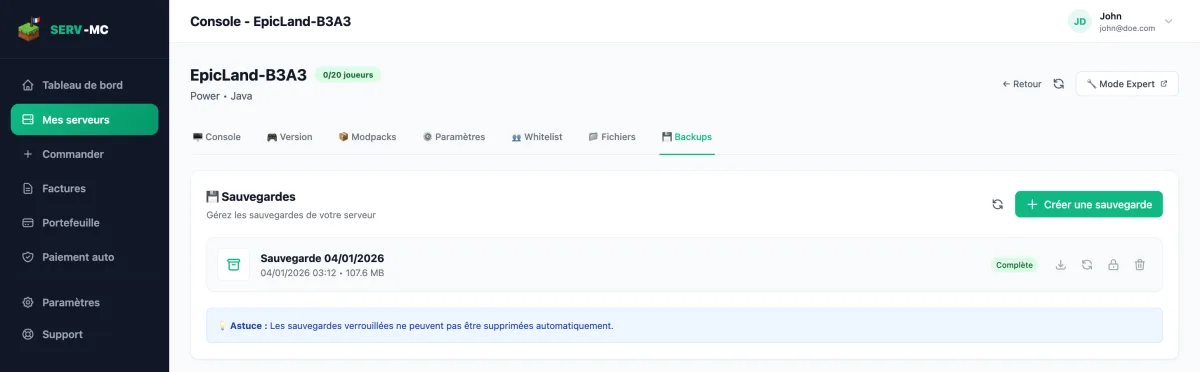
Panel Backups tab: create, restore, download and lock Créer (create): Backups tab, Nouvelle sauvegarde (new backup), give it a clear name, for example "before 1.21 update", before any version or modpack change.
Restaurer (restore), from the backup's row: replaces the current files with those from the chosen backup. This overwrites the server's current state, with no way back once confirmed.
Télécharger (download): grabs an archive locally.
Verrouiller (lock): a locked backup is never automatically deleted to free up space.
Without the Backups option turned on, you can back up yourself by regularly downloading the world folder over SFTP.
Tutorials 2
Restricting the server to my friends (whitelist)
Add each username in the Whitelist tab, then turn on Liste blanche (whitelist) under Paramètres > Sécurité.
Whitelist tab: type into the Pseudo Minecraft field (Minecraft username) the exact username of each allowed player, including your own.
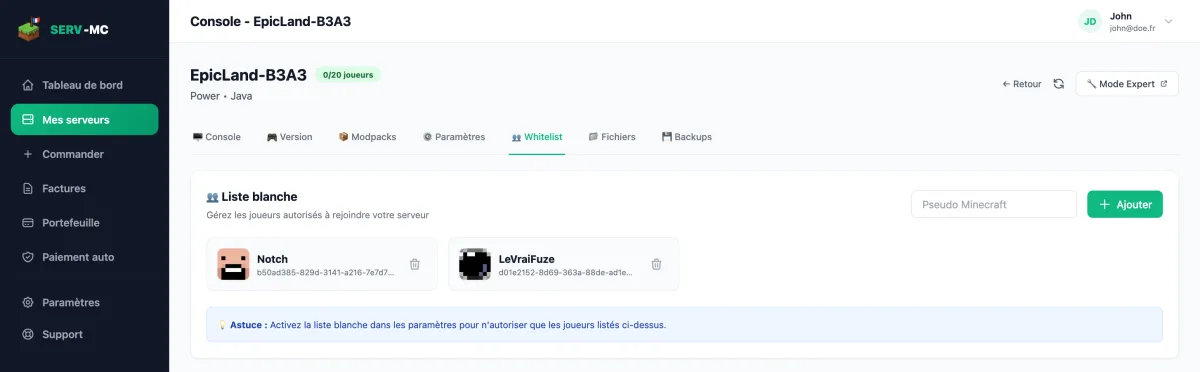
Panel Whitelist tab: adding allowed usernames ParamètresSécurité tab (Settings > Security): turn on Liste blanche (whitelist), and optionally Forcer whitelist (enforce whitelist) to disconnect already-connected players who aren't on it.
Click Enregistrer (save).
The console commands whitelist add Username and whitelist remove Username do the same thing without going through the tab. On Bedrock, the equivalent is the allowlist.
Importing my solo world or a downloaded map
Send the world folder over SFTP or through the Fichiers (Files) tab, then set its exact name in server.properties.
Before you start
The server must be on a version equal to or higher than the world's.
On your PC, find the world folder in
.minecraft/saves/.Stop the server, then send the whole folder to the server's root, over SFTP or from the file manager.
The
level.datfile must be directly inside this folder, not in a subfolder.Open
server.properties(Fichiers tab) and setlevel-nameto the exact folder name.server.properties:extrait> level-name=imported-worldStart the server.
Common errors
- On Paper, the Nether and the End live in separate folders (
world_nether,world_the_end): they're recreated automatically on first start if missing. - The world doesn't load: check that
level-namematches the folder name exactly, including case.
No answer here. Try the help center home or open a ticket.